


I get directed many questions about VSCode, and I get it you like it too! There are a few differences in how things are and what you should remember when using this.
The Terminal
The Terminal is NOT a VScode terminal. It's a Terminal, plain and simple. It's like you open the terminal on your machine. This means if you are on a Mac or Unix system, commands might differ from if you are on Windows.
Now, shall we get going... Great 👍 ! So, there are a few sections into this: if you are a student at Code Institute and got referred here, then GREAT. 🦺 🙏 Do give me a shoutout if this guide helped you on Slack! 🙏
Pre-requirements
Windows
Install Git (Link) (Windows)
Install Python (Link) Make sure you Add to Path (See Screenshot below)
It's advised to install this into a folder like
C:\Tools\Python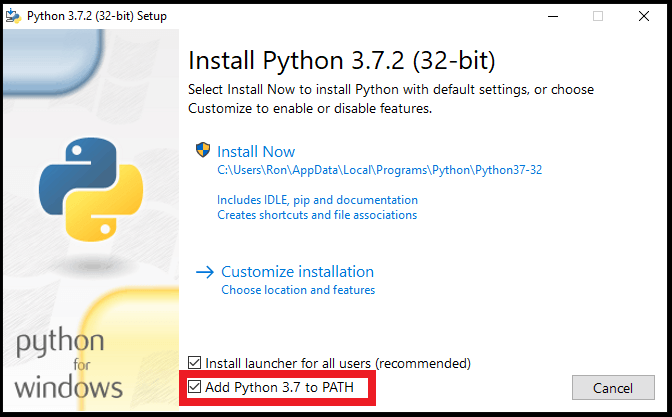
Mac
Let's set up code and install developer dependencies to supercharge your mac.
xcode-select --install
Install HomeBrew
Homebrew is the lost package manager in Mac, and as a developer, it's one of those things you will have to get used to working with. You can mostly install any packages from the terminal So to install it. It's as simple as open your terminal and paste in the code below 👇
/bin/bash -c "$(curl -fsSL https://raw.githubusercontent.com/Homebrew/install/HEAD/install.sh)"
Once this is completed, welcome to the world of homebrew. So, to install git and python, we can do
brew install git python@3.12
Voila is simple and easy. (Note that you might see --cask this when installing with Homebrew. Cask is a flag we use to install it as a program and not just a tool. Think of a tool as CLI and CASK as an actual GUI app)
Well done 👏
Both
- Install NodeJS (Trust me, it will be better later.)
Before we begin, we need a few requirements, so if you have NOT installed these, please do so before reading.
Please Note: The screenshots here are mostly for Windows users. If you are on a Mac or any Linux distro, please follow the guides according to their specs.
So you all done now? 🤣 Or maybe you already had it all installed and were like, "Yeah, yeah."... Anyways, installing VSCode is quite straightforward.
Installing VSCode
Note: There are two versions of VScode. Insiders and Normal: Normal is updated once a month, and insiders are updated once a day. For the past 6 years, I have been using insiders, and I have had 3 bugs that have stopped me over the past 3 years, and those were fixed an hour later 😎 , so I'm fine with using insiders.
TLDR - What to choose?
Insiders, if you want the bleeding edge and the newest version
Normal if you want the most stable and tested version
Installing Vscode
Windows
Pick your poison 💀 and download Visual Studio Code
Install it by following the steps, but do note the ADD TO PATH
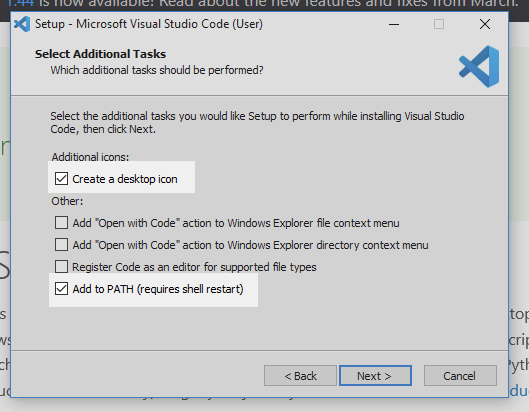
Add all checkboxes: You can pick The checkbox for the desktop, but the others will give you a right-click function on files and folders + adding it to the path.
Mac
- If you are on a MAC, we can use
HomeBrewagain
VSCode
brew install --cask visual-studio-code
VSCode Insiders
visual-studio-code-insiders
VScode And You
Now that we have installed it let's get into a developer's mindset and see how Vscode can help you. You must reset your mind if you are coming from Gitpod / Codeanywhere.
VSCode is NOT running in your browser, so a terminal is on your machine. How do you download a file? Just like you download any file. These are files physically on your machine. Treat them as such. 👌
VSCode, in simple terms, is like a notepad with Super Powers 🦸♀ , so in the barebone, VSCode is just a text editor, but we can expand on this with plugins or extensions as it's called. Note that this doesn't add things like MySQL** or MongoDB** etc. it adds the ability to read things in a better way, think of it as HTML, give the colours, and report if you have errors in your syntax etc. Now below, I generated up a list of plugins you should have. These are in no particular order, but I will explain briefly what they do in each part.
Front End
User-Centric & Interactive Frontend (Portfolio 1-2)
- Live Server (Link)
This gives you a live server, so it will automatically refresh when you develop and save. Now, normally, you can open the file but not when you deal with javascript. So this is your go-to tool. You install it, open an HTML file, and right-click and hit
open with a live server.
- Live Sass Compiler (Link)
Same author as above, this is for people that like to write
SASS/SCSS. You can configure this per workspace or global settings to your liking. (More details further down on snippets).
- Bootstrap 4 CDN Snippet (Link)(Self Promo)
I made this plugin after been working with VSCode for a while. It is meant to help with the boilerplate of Bootstrap. No more do you need to find the CSS and JS to make it match. You can use
!bcdnand voila ready to go! This now supports Bootstrap 4 and 5, but also all the bootswatch themes
PS Feel free to give it 5 stars and a review 😏 🙏
- Error Lens Link
ErrorLens turbo-charges language diagnostic features by making diagnostics stand out more prominently, highlighting the entire line wherever a diagnostic is generated by the language and prints the message inline. In plain English, it will highlight all lines and nag you to fix them. Making it easy to spot your errors instead of small squiggly lines.
- ESLint Link
Integrates ESLint into VS Code. If you are new to ESLint, check the documentation. Highlighting errors in your javascript code etc., and making sure you are using best practices.
Backend
Data-Centric Development & Full Stack Development (Portfolio 3-5)
Python Extension for VScode (Link)
For Flask, see Flask snippets for minor tweaks and setup
For Django, see Django snippets for minor tweaks and setup
Databases
You can either install them locally on your machine by downloading them or use a cloud service. (If it's wanted, let me know, and I can set up a guide on how to use docker 🐳
MongoDB
Download and install Locally (Link).
This requires setting it up etc. so read the Windows Docs or Mac Docs
Use Mongo Atlas - This will require you to add a
Connection String
MySQL
Download and install Locally (Windows)
Install Locally with Mac using Homebrew
brew install MariaDB
PS: MariaDB is an open-source drop-in replacement for Mysql, so it's the same.
- Use Heroku Postgres
The Terminal and you
This is where people get thrown off A LOT, so I will try to explain this in as simple terms as possible. 🤷♂️
So, in the world of computers, there are loads of terminals. Most UNIX computers (Like CodeAnywhere / Gitpod) use Ubuntu, which is Linux. These machines use Bash, so any BASH command works. Windows is using their Powershell or Command Line aka CMD. Still, you can install git basha stripped-down bash version on Windows. This is not recommended, as setting up things can be a pain. In simple terms, it's not recommended you want a proper Linux experience to install Linux on dual boot. OR if you feel tech-savvy, you can use WSL/WSL2(Requires Windows 10). Read more under the WSL section below.
WSL/WSL2
WSL is Windows Subsystem Linux, which gives you a full-blown Linux environment under the hood in Windows, great to execute ANY terminal commands on. A quick setup can be found here. This means you can now execute commands like in Gitpod / CodeAnywhere as a pro 👩💻 After setting it up and wanting to use WSL inside VScode, you can use some advanced settings.
CMD
This is the Windows-type equivalent of bash now I say type as it's not its Windows version of a terminal. You can type commands, except that Windows found out not all commands should be needed, so think of it as a stripped-down version of bash. When working in Windows, this is the simplest thing to use and most recommended. Note that many commands pythongit differ, and you might have to google the differences.
PowerShell
It works just like CMD but is more modern. I don't recommend it, as it has some other quirks. Feel free to use it, though.
Windows Terminal
If you are on Windows 10, then this is for you. It's a developer terminal that is quite powerful with some nice customization. It's just a wrapper around all terminals, but you can read more about it here.
Python and Virtual Environments
So, a virtual environment is strongly recommended not to pollute your machine. Think of this as an isolated box per project. So, the best thing you can do is create this inside your project.
I would strongly recommend having 1 folder and having a folder per project. So when you want to work on a project, open that folder.
Windows: An example would be in a Let's say C:\ For Windows users, you would have it like this.
-C:\
--Code
---Project1
---Project2
---Project3
This means you can access any project by going to C:\Code\YourProject
Mac note~ in Unix is the same as the home folder, so for mac, it's /Users/YOURUSERNAME instead of the path that we can say ~
-~
--/Code/
---Project1
---Project2
---Project3
To use a virtual environment, you need first to install it and then activate it.
For this, we can use pipenvWhich package can we install for Windows
pip install pipenv
- Close the terminal
Mac
pip3 install pipenv
All done👏 now, let's tell PIPENV to use the .venv folder in the project by default.
Windows
SET PIPENV_VENV_IN_PROJECT="enabled"
Mac
- Open your terminal and paste the following code 👇
nano ~/.bash-profile
Then paste in 👇
SET PIPENV_VENV_IN_PROJECT="enabled"
Note: Press Control X, then Y + ENTER to save
source ~/.bash-profile
Testing it all out
Let's now try to test this out and make a Flask application.
Open your Project folder (for argument's sake, I'm using Project 1) as above
cd ~/Code\Project1Create a folder called
.venvOpen the terminal and execute the following command
pipenv install Flask pep8 autopep8 pylint pylint-flask
The additional packages are used for lining and errors.
Once installed, it should have populated the .venv folder you have with some files. If not, scroll up and make sure you have set the PIPENV_VENV_IN_PROJECT="enabled" correctly. Make sure you also close the terminal.
Workspace Settings
Workspace settings are settings per folder or project if you want. You can override global ones or set special ones like the one below to set up a virtual environment.
Windows
{
"python.pythonPath": "${workspaceFolder}\\.venv\\Scripts\\python.exe",
"python.terminal.activateEnvironment": true,
"python.linting.enabled": true,
"files.autoSave": "onFocusChange",
"terminal.integrated.env.windows" : {
"SECRET_KEY": "my secret key here",
"DEV": "1",
"FLASK_DEBUG": "1",
"MONGO_URI": "my uri here",
"FLASK_APP": "app.py"
"FLASK_ENV":"development"
},
}
Mac*
{
  "python.pythonPath": ".venv/bin/python",
  "python.terminal.activateEnvInCurrentTerminal": true
  "python.linting.enabled": true,
  "files.autoSave": "onFocusChange",
  "terminal.integrated.env.osx" : {
  "SECRET_KEY": "my secret key here",
  "DEV": "1",
  "FLASK_DEBUG": "1",
  "MONGO_URI": "my uri here",
  "FLASK_APP": "app.py"
  "FLASK_ENV":"development"
},
}
NOTE: Make sure you reload vs code - Pro tip here is you can press CMD + SHIFT + P (Mac) or CTRL + SHIFT + P on Windows. This will open the command palette where you can access all settings (if it's prefixed with \> if it's not, it's all files and fussy searching. 😁 Anyways, type \> Reload and find \> Developer: Reload Window
All done? 👏 Nice, let's finish off our Flask app. Note: It should say (.venv) at the left side of the terminal, or vscode should have asked you if you want to read environmental variables, which you should say yes to. If this is not the case, you can enable the virtual environment yourself by executing
pipenv shell
Create an app.py file and paste the following content below into it.
from flask import Flask
app = Flask(__name__)

@app.route('/')
def hello_world():
    return 'Hello, World!'
And in the terminal, we can now run flask run
Now you should have auto reload a save and flask server running on port 5000, ready to develop like a pro. 👩💻
Now, that should be it, and you are ready to code in any language that Code Institute provides. Please note that we do have a channel run by students #community-vscode
If you have questions, leave a comment below. 👇